 The Secure Shell (SSH) is still the de facto way of connecting to remote Linux servers and various network devices. Rather than losing importance, its use has increased with the greater reliance on automation technologies such as Ansible.
Suppose your dev team stands up a new webserver in their test environment and neglects to open ports 80 and 443 in the server's firewall. The team contacts you, asking you to troubleshoot the problem. You could use SSH to remote into the webserver. You make the connection, enter the password when prompted and complete the firewall configuration. It's quick, easy and secure. But is there a better way?
This tutorial covers implementing and using key-based authentication to support easier SSH authentication and improved automation. SSH authentication methods are likely topics for CompTIA Linux+ and CompTIA Security+ exams.
Use the tutorial with two or more Linux-based virtual machines in your home lab. Another good way to familiarize yourself with key-based authentication is to use it when connecting to a Raspberry Pi computer. These devices are a great way to get started with Linux.
Standard SSH Authentication
The standard syntax for SSH includes the ssh command, the name of the user connecting as, and the destination device's name or IP address. Following that, the remote system prompts for the account's password.

Figure 1: Password challenge for a standard SSH connection
You're now connected to the system and may either make changes based on your current identity or use sudo to elevate your privileges.
What Is SSH Key-Based Authentication?
Key-based authentication replaces the "what you know" password portion of the SSH authentication challenge by using a public/private key pair. This asymmetric encryption uniquely identifies the user. Perhaps more importantly, at least in the case of automation, it does not require the manual entry of a password. SSH passes the authentication key automatically. Assuming the remote system accepts the key, authentication is immediate and silent.
Implementation Steps
Implementing key-based authentication is straightforward and consists of three steps:
1. Generate a key pair
2. Copy the public key to the remote server
3. Test the authentication
You may also edit the /etc/ssh/sshd_config file to require key-based authentication on your remote systems.
The following are additional details on these three implementation steps.
Generate a Key Pair
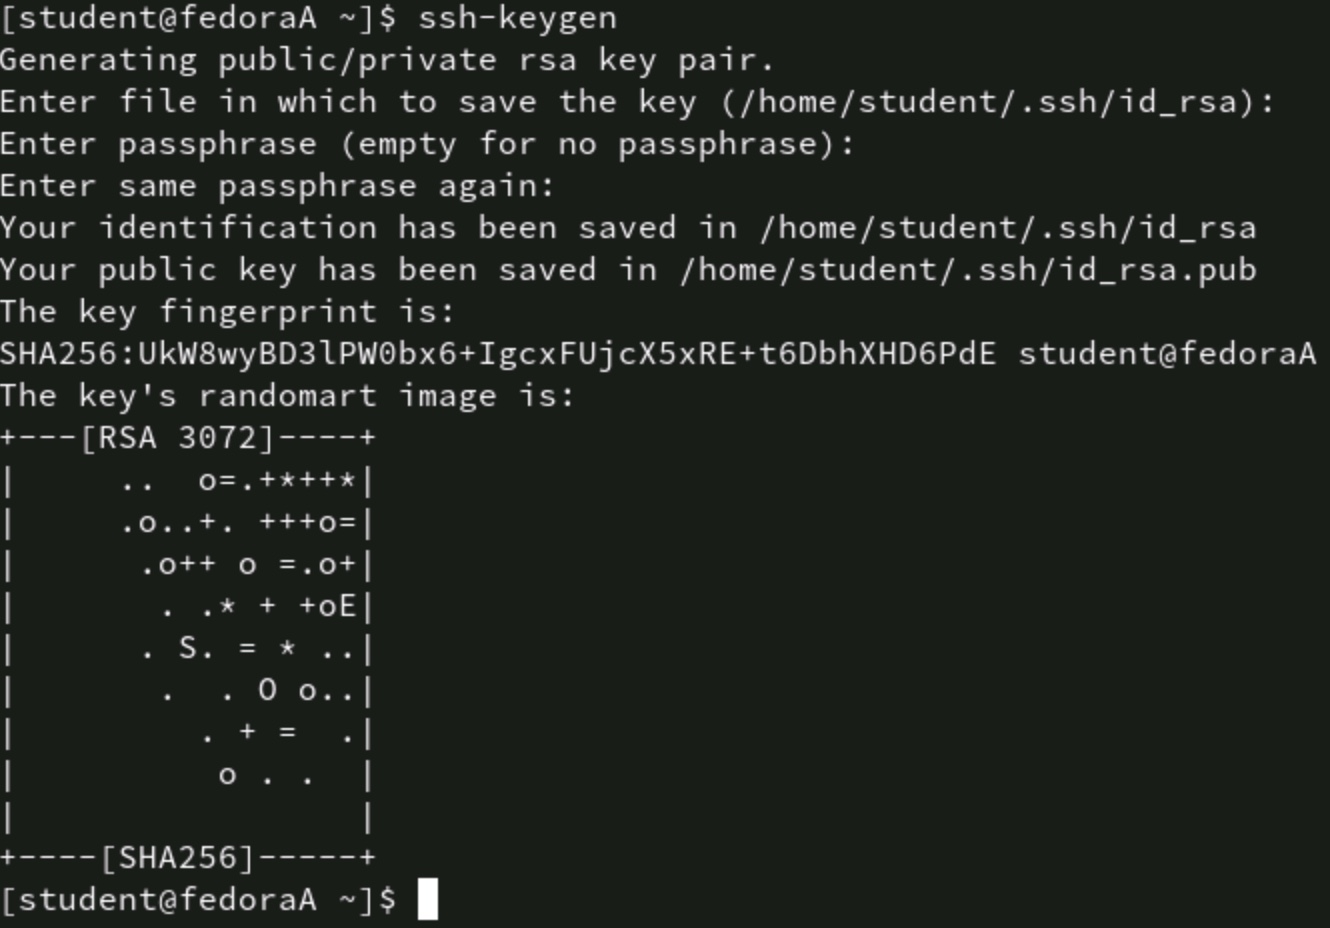
A public/private key pair is a mathematically related set of keys that can uniquely identify a user or computer. The Linux ssh-keygen command generates the keys. Depending on your organization's security requirements, you can use the -t option to create various types of keys. Choices include RSA, DSA, and ECDSA.
Use the following command to create the key pair on the client computer from which you will connect to remote devices:
# ssh-keygen
Check the ~/.ssh directory for the keys. You will see id_rsa (the private key) and id_rsa.pub (the public key). Key names may vary depending on the encryption method selected.

Figure 2: The ssh-keygen command generates a public/private key pair
Scroll to the bottom of the file and observe the username. Remember, this is a user the remote system recognizes.
The key generation utility offers you the chance to set a passphrase. Press Enter twice to skip this prompt. You probably don't want to set a passphrase, especially if you're using SSH in the context of automation.
Copy the Public Key
The key pair now resides on your client computer. This is probably the computer on your desk that you use to remotely connect to the various devices you're responsible for it. The next step is to copy the public key to the remote system.
Linux has a specific command for this task, too. The command is ssh-copy-id. For example, to copy the key to remote server 192.168.1.101 for user student, type:
# ssh-copy-id student@192.168.1.101

Figure 3: The ssh-copy-id command copies the user's public key to the remote server
The remote system prompts you for a password. Type the password for the user account you're using to connect to the destination server. If all goes well, this is the last time you must enter this password.
You could check the remote system's ~/.ssh/authorized_keys file and find the public key.

Figure 4: The contents of a public key file
Test the Authentication
Testing the new authentication method is as simple as establishing an SSH connection. Type the usual ssh command and observe that the remote system doesn't challenge you for a password. You're simply connected!

Figure 5: No password challenge for a key based SSH connection
The SSH connection passed the public key in the background, proving your identity.
The obvious benefit is the ease of connection. It's handy to no longer be challenged for a password. In the context of automation, however, key-based authentication frees administrators from having to enter or attempt to secure passwords in files. Automation tools can connect using SSH without an administrator being present and fulfill their tasks. It is difficult to overstate this function's importance in today's world of automation.
Enforce Key-Based Authentication
Key-based authentication for SSH certainly improves your organization's security posture. To enforce this method, update the /etc/ssh/sshd_config file on the remote servers to require key-based authentication and refuse password-based connection attempts.
Open the /etc/ssh/sshd_config file on the remote server for editing. Find the stanza that reads PubKeyAuthentication and edit it to yes. Find the stanza for PasswordAuthentication and set it to no.
PasswordAuthentication no
PubKeyAuthentication yes
While you're at it, consider other SSH security best practices, such as whitelisting users and refusing remote connections by the root account. The following entries may be useful in better securing your SSH connections. Be sure to understand and test these before implementing them in a production environment. A mistake can halt remote connections to the server.
PermitEmptyPasswords no
PermitRootLogin no
AllowUsers admin1
Keep Practicing
SSH key-based authentication is critical for today's remote administration and automation tasks. Take a few minutes to inventory the Linux servers and network devices you routinely connect to over SSH and then create a key pair. Copy the public key to these systems. I also encourage you to configure these destination devices to require SSH keys for authentication and to refuse password-based attempts.
If you're preparing for certification exams like CompTIA Linux+, CompTIA Security+ or CompTIA Cybersecurity Analyst (CySA+), be sure you can identify the components and commands related to key-based authentication. Work through these steps in your home lab environment until they are second nature.
Learn the skills you need with CompTIA CertMaster Learn. Sign up today for a free trial today!


.png?sfvrsn=12f1e5eb_2)

0